Showing posts with label skin on frame. Show all posts

Wednesday, December 26, 2012

Skin on Frame Housing - the yurt gets a roof

Progress on the yurt continues.  Much of the progress is imperceptible to anyone but myself but the progress is there.  As it turns out, my initial suspicion that my first yurt would be a prototype for working the kinks out of the design turned out to be true. So let me share what I've discovered so far.
 I got the crown on the central ring of the yurt.  I used some kayak rib stock, 1/4 inch by 3/4 inch white oak, socketed into the central ring and lashed together with tarred seine twine. The idea behind the crown is that it will be open under normal conditions but covered when it is raining or heat needs to be kept in the yurt.
Another discovery I made after the initial assembly of the yurt was that for the sake of getting a good setup it helped to trace a circle on the ground first before erecting the walls so that the walls would form a perfect circle.  The perfect circle is essential so that all the rafters are the same distance from the central ring.
I also discovered that I had much more wood in the central ring than I needed and so it was too heavy and difficult to get into position when no help was available. What I did to remedy the weight problem was to cut some of the extra wood away from the center of the ring.  It was way stronger than it needed to be. 
 The next step was to cut out some fabric for the roof.  It took me some time to work out the trigonometry for the roof cover shape, but I did it.  But I have learned to distrust theory and test with an actual life size cover.  The other reason for getting the cover in place was that a series of rain storms were coming into the area and that would be a good test to see how the cover would stand up to the wind.
Here's an inside shot of the cover.  The wind lifted it some and pushed it off center.  Part of the problem is that the shape of the cover is like a pie with a wedge cut out of it and the edges adjacent to the missing wedge get pulled together and glued or sewn resulting in the desired pyramidal shape.
The cover is made out of some sort of vinyl covered fabric that is used for advertising banners.  A friend gave me a bunch of these banners and I cut them up to fit the roof. The fabric has two problems.  One is that it is very heavy and the other is that it is very stiff.  The combination of weight and stiffness makes it very difficult to pull this stuff up on the roof.  The weight also works against its portability.
On the plus side, the cover survived the storm and did not get blown off.  I also discovered that once again, there is nothing like building something to test a design because until you do, it's next to impossible to know what sort of problems the design has.  So far, none of the design elements have been complete failures but lots of them can use improvement.
The list so far.
The wall battens are slightly too flexible.  A bit more stiffness is advisable even at the expense of greater weight.
The skin is too stiff and heavy.  Lighter weight is advisable.
Other commitments have kept me away from the yurt, but the learning continues.  I will continue to post whenever there is progress or even when design ideas fail.

Sunday, February 12, 2012

Yurt or Skin on Frame Portable Dwelling

I haven't done much boat building lately since I have been busy working on a yurt.  Though this blog is supposed to be all about skin on frame boats, I thought it would be OK to indulge in some related skin on frame construction, namely, the yurt or portable dwelling.
The idea of building a yurt came to me after last year's October camping trip.  We were pretty far south but at high elevation and so we encountered snow and cold nights at times.  We had an adequate tent and warm sleeping bags but the sun went down early each day and then stayed away for twelve hours so that once it got dark there was little to do but crawl into the bags and listen to books on our mp3 players.  Camp fires and eating are usually good camping entertainments, but most campsites have fire rings that keep the heat of the fire away from the camper and otherwise hamper what should be a good entertainment.  Likewise, cooking food when it is near freezing is possible but once the food is done, it gets cold in a hurry and then you have to clean up in the dark and cold.
So the idea of a tent that was big enough to stand up in and build a fire or set up a camp stove in and cook in and eat in, all in comfort and warmth wormed its way into my consciousness.  The idea of a tipi came to mind, but those require long poles and a lot of canvas and would add a lot of bulk to an already bulky camping load. So then I thought about yurts.  And as a little research showed, there were lots of articles on the topic on the internet. 
In addition, my neighbor, Tim Anderson had built a yurt and so I could use him as a technical adviser.  So off I went on the yurt adventure.  I quickly found out when doing the research that everyone builds yurts their own way and nobody seems to tell you much about general principles like how strong to make the walls or what the pitch of the roof should be, whether the thing will hold up to a snow load, heavy winds and so on.  And so I decided to build a prototype yurt that could sit behind the shop.  I would use it to work out the design details and once that was done, I would build a smaller more portable and lightweight yurt for camping.
So here goes with the photos.

 The target diameter of the yurt is 16 feet so I needed to construct 48 feet of wall.  Circumference of a circles is pi times diameter of the circle, remember?

Here's a closer up view of the wall with another semi-nomadic structure behind it.  Nomadic if movable by fork lift fits your definition of nomadic.  In any case, for the sake of convenience the wall of a yurt is usually constructed in sections so that each section is of a size that is easy to lift and not too wide to transport.

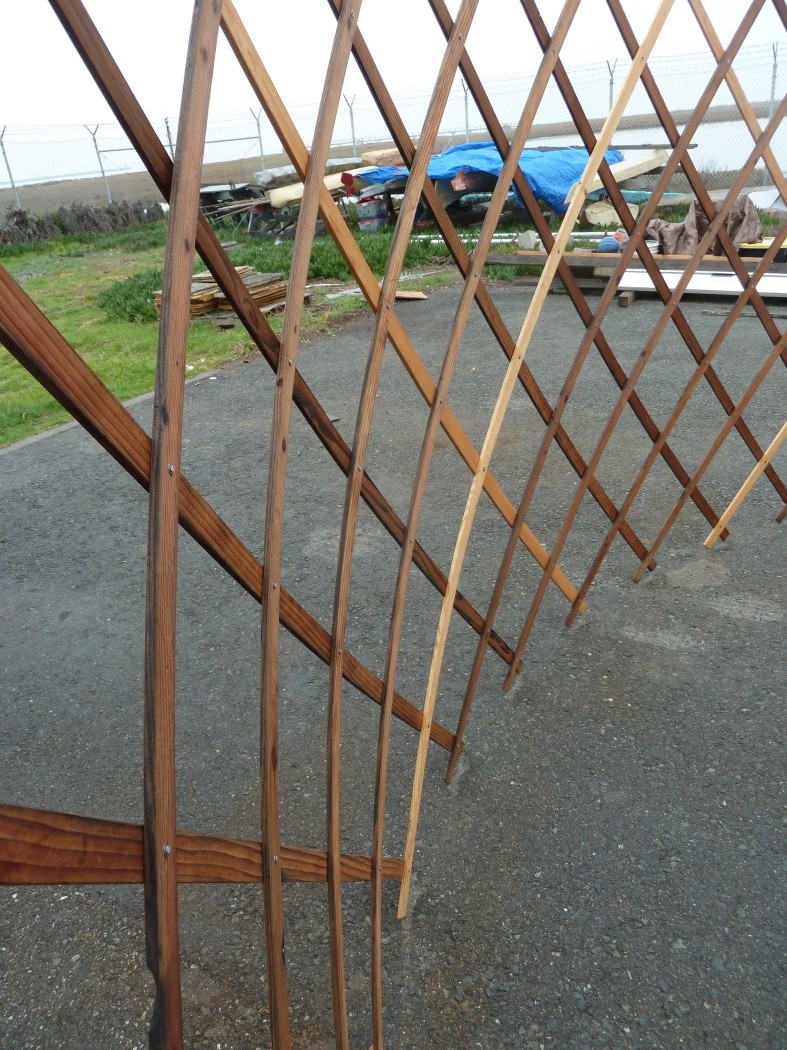
And here's a shot that tries to show the curvature of the lattice wall.  Hard to visualize this sort of thing until you actually build the wall.

Intersections of the wall slats are held together with clinched nails, that is nails whose tips are bent over and hammered down and buried in the wood.

Here's a view of the junction from the other side where the tip of the nail is buried in the slat.


And here is one section of the wall, all folded up into a 30 inch wide section.  When unfolded, this represents 24 feet of wall.

When the two sections of wall are joined as shown here (temporary joint made with clamps) the wall is complete.  And the 96 inch long slats at an angle make the wall 72 inches tall.

The other two ends of the two wall sections will get connected to a door frame, not yet built.  Note alternating colors of wood.  I had enough old redwood deck boards to make almost the whole wall but had to buy a few extra doug fir two by fours to top off the number.  The redwood was free and light.  The doug fir was about ten dollars total and stronger than the redwood but also heavier.  We will see how they hold up over time.
Stay tuned for door frame, roof and canvas cover yet to come.

Thursday, December 2, 2010

И. Растеряев. Моя деревня Раковка - My village is Rakovka.


a few posts back I put up a little youtube video clip of a Russian Aleut accordion player. So most recently, I got a friend invite on youtube from sunfish737, another Russian accordion player, not Aleut though. Check him out. he has a bunch of videos of himself playing accordion. sort of a punk sensibility. The accordion seems to be to Russians what the guitar is to Americans, a medium of proletarian expression.
But OK, so what does this have to do with boat building? Check out the background in this video. It is what the British call a hurdle, I think, a fence made of small diameter sticks woven around verticals stuck into the ground. Anyplace that can grow these can come up with wood for a skin on frame boat.
Anyway, enjoy the accordion playing.