Monday, February 29, 2016

Two Canoe Paddles

These paddles are replicas of a paddle in the George W. Brown Jr. Ojibwe Museum & Cultural Center in Lac du Flambeau, Wisconsin. Link HERE
The original was a very nice specimen carved from maple. It was in pristine condition, possibly made for sale but never sold. The paddles are longer than typical canoe paddles you now see.  It was probably made for the stern paddler who could use a longer paddle for steering.
1
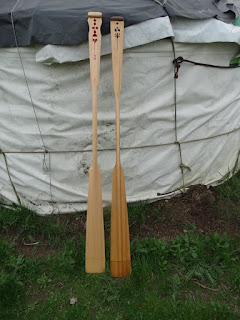
The two paddles full length, 62 inches.

2
The handle end side one.  The carving in the handle variations based on the original.

3
The handles, flipside. Note the paddle on the right has a frowny carving on one side and a smiley carving on the other.

4
The grain on the blade.


5
The grain on the other blade.  The middle lamination has something like 60 growth rings per inch.  Very old and slow growth. This paddle by the way is newer than the other one, hence its pinker color.  The color deepens with exposure to light.

Overhaul the Playboat, Part 3

Part three of the overhaul, new lashings for the keelson and a paint job for the frame was relatively easy. Not much thinking or design choices required.  The lashing went fast.  The painting took way longer than I imagined, about 3 hours.  Next time I will have to pull out a spray gun.
1
New running Greenland style lashing for the keelson.

2
New lashings for the chine stringers.

3
And finally a coat of  Desert Storm tan camo latex paint that was left over from painting a whole bunch of tin sheds and free for the taking.  It's butt-ugly, but I'm going to get some red spray paint and spiff it up some. Can't paddle a boat that might be miffed at you for painting it ugly.  That would be dangerous.  Never piss off your boat.  Your life is in its hands.

Next brighten up the paint on the frame and then put on some skin and paint that.

Sunday, February 28, 2016

Overhaul the Playboat, Part Two

Yesterday I got in a full day on the playboat.  Let's backtrack.  The lashings on the playboat were rotting from too much sun.  So I decided to strip the skin off the boat and redo the lashings.  Soon as the skin was off the boat, ideas arose.  Let's stretch the boat two feet by adding an Unangan style nose and tail to it, thereby increasing volume (with me in it the stern was frequently under water) and improving its tracking, making it more suitable to SF Bay paddling than its original configuration.  So part 2 is mostly about adding the nose and tail to the original boat and replacing two deck beams. Still haven't tackled the relashing.

1
To get the right shape for the nose piece, I clamped two slats to the gunwales then laid a piece of plywood over the top and traced lines inside the slat to transfer the shape to the piece of plywood.

2
Here are the lines for the new nose piece.

3
The new nose piece installed. I also rounded the bottom edge of the nose piece.
 4
A view of the nose piece from the bottom.

5
 I added two pieces of new wood right behind the nose piece to fair the top into the gunwales.

6
Here's the ragged deck beam that needed replacing.

7
And here's its replacement.

8
The backrest also needed replacing.  Here it is detached from the gunwales.  The original problem was that someone had sat down on it too hard and cracked the dowels that attached it to the gunwales.

9
The new backrest in place. The wider shoulders give it more contact with the gunwales and hopefully make it harder to break  off  from the gunwales.  I also used three screws on each  end instead of the dowels I used previously.

10
The new nose piece in place.

11
The new tail piece in place along with a new keelson.

12
And finally, a long shot of the whole thing. 

End notes:  Still to go, relashing and painting of the frame and sewing on a new skin and painting that.
Not mentioned so far, the trick with redoing the boat was to make the new shape such that the boat would trim properly with the skin on.  Since the boat sat a little low in the back for my weight, I figured that the extra volume in the stern would rectify that, provided that I didn't add too much extra volume in the bow.  We won't know till I put the new skin on and float this boat.  
As for materials used in the overhaul, the new nose and tail pieces are redwood for rot resistance.  Moisture seems to linger longer in the two ends of the boat.  The backrest replacement was made of white ash that I salvaged off a discarded bed frame.  White ash is strong though not necessarily very rot resistant, but since was right at the cockpit, it should have a chance to dry out better than the wood in the ends of the boat.  In any case, the boat should be good for another ten years.
Thursday, February 25, 2016

Put a Bird on It

Here at Alameda Point, we like to put a bird on it.  Every spring, the birds come in and get ready to nest and then they nest and then there's baby birds.  It's put a bird on it time, island style.
Great blue herons, mallards and coots.

Don't have time to look up the name of this one.

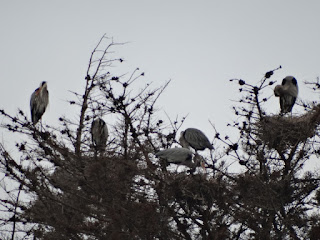
Great blues up in the Monterey cypress they have chosen as their nesting trees.  They re-use the nests.

And of course, Canada Geese.
Make it better, put a bird on it.

Time to Overhaul the Playboat

I decided it was time to overhaul the playboat.  Main reason being that the sunlight had deteriorated the lashings in the cockpit area.  The skin was still OK.  As I often do, I used materials in this boat that I haven't used before to see how they hold up.  And the lashings which were done in cheap poly-unbraided string had gotten eaten by the sun. So, strip off the skin and proceed.  This is part one of the series showing what the frame looked like after I pulled off the skin.  Subsequent parts will show repairs and overhauls.

1
Here''s the skin pulled off the boat, actually cut off.  I won't reuse it.  It's nylon which shrinks when the sun shines on it. I aim to replace it polyester.

2
The boat sans skin, defrocked, naked.  Goose pond and SF skyline in the background along with US Govt. cyclone fence separating us from the federal land.

3
Deteriorated lashings - the primary reason for rework.

4
Though the wood has gotten ragged and the varnish deteriorated, the lashings are still good where they weren't exposed to the sun.

5
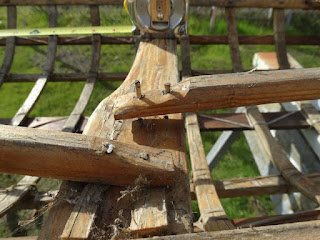
With outdoor storage, spiders move in, hence the cobwebs.  Also note doweled stringer come loose with dowels working their way out of their holes.  Needs to be backed up with lashings, or heavens forbid, screws.

6
Here's the fuzzy wood look that wood gets when repeatedly exposed to water.  This is pine.  Doug fir and redwood which I also used in this boat do not get this disease.

7
Finally, for aesthetic reasons, I decided to put a bird on it.
8
And another version of Put a bird on it!

Monday, February 22, 2016

Shoe Lasts

I've been wanting to make some shoes out of fabric and tried just draping fabric over my feet and marking and cutting and sewing, but that approach was cumbersome and inaccurate, mostly because if you are trying to fit your own feet, you can only do it bent over in an uncomfortable way. So I did some research and found out that the right way to make shoes is to first construct a pair of lasts, that is wooden models of your feet that you can then use to assemble fabric over the same way that a dressmaker uses a mannequin.

Here's my first attempt at a pair of lasts. They are made of redwood and red cedar, what I had laying around and what was easy to carve.  Professional lasts are made of  a European relative of beechwood.  

Another view of the lasts.  I have also sliced the lasts into two pieces for easier removal from the shoes.  

Glueing up redwood two by fours to get sufficient elevation.

Added a block on the side to get adequate width for the lasts.

My feet traced out on pieces of 1/8th inch plywood.  Next step was to trace around the foot patterns and then start carving to match my feet.

The last sitting on the fabric which will form the soles of my new shoes.

Foot patterns with notations indicating elevation of my feet at various points.

Can't see much here, but I'm draping some felt over a last so I can mark a pattern on the felt to cut out.
So now I'm on my second iteration of the lasts.  A last is not actually an accurate copy of your feet but more of a mold for the shoes you intend to make.  As such it needs to be slightly longer than your feet to account for toe room.  It also needs to be a little taller than your feet to account for insoles or padding and socks that you will have inside the shoes in addition to your feet.  And if you want to make pointy-toed shoes, you will want a different last than if you want to make a round-toed shoe and so on.  And if your two feet are not exactly symmetrical, you have the luxury of making custom lasts that let you have shoes that not only are different lengths but also heights and widths. Still learning.

Hand Crank Sewing Machine

Last week we got a hand crank sewing machine at the friends of the Oakland Museum White Elephant sale.  It's the head off a Singer 127 treadle machine removed from its treadle base with a hand crank screwed onto the end.  Simple.  Works.  It still runs smooth in spite of being close to a hundred years old.  We already have a number of sewing machines but we wanted to have one that we could take on the road and use in camping spots where there was no electricity.  We probably could have simply brought needles and thread, but a machine offers some speed advantages.  Plus the fact that the machine has already lasted a hundred years speaks well for its ruggedness.  The main downside of the machine is its weight, an unavoidable consequence of its cast iron body.  But we'll see how it works in the field once we start using it there.  The other thing that speaks well for the longevity of this machine is that it's still possible to get spare parts for it.
Report on use of the machine in the field to follow.
1
Here's the machine sitting on its base.  

2
The hand crank is attached to the body of the machine near the base.

3
The crank is linked to the hand wheel by a little tab that sticks between two spokes of the wheel.

4
One of the front plates pulled out to expose the shuttle which holds the bobbin.  Unlike modern machines where the shuttle is round, this one is bullet shaped and swings back and forth in an arc instead to going in a circle like the modern ones.  Actually, both kinds oscillate, only this one goes through a smaller section of a full circle.

5
Here's the shuttle freed of the machine.  The bobbin slides into the body of the shuttle from the left.

6
The bobbin winding mechanism.  The thread guide travels on the heart shaped cam and wags back and forth, distributing the thread evenly along the length of the bobbin.

7
The bobbin in place on the winder with lovely blue thread being would on it.