Thursday, December 15, 2016

Handline Assembly for Kayak Fishing

Here's some info on the handline rig I've been using to fish from my kayak.  I got the design from my friend Marc who introduced me to his fishing grounds.  This kind of rig makes it possible to fish from a sit-inside kayak.  You don't need a sit on top with rod holders, bait wells, fish hatches, etc. etc.
Much of the complexity of commercially sold kayak fishing setups comes from the fact that the industry wants to sell gear.  It's that simple, and guys being guys want to buy gear.  But you don't need all that much gear.
So here it is, the handline rig.
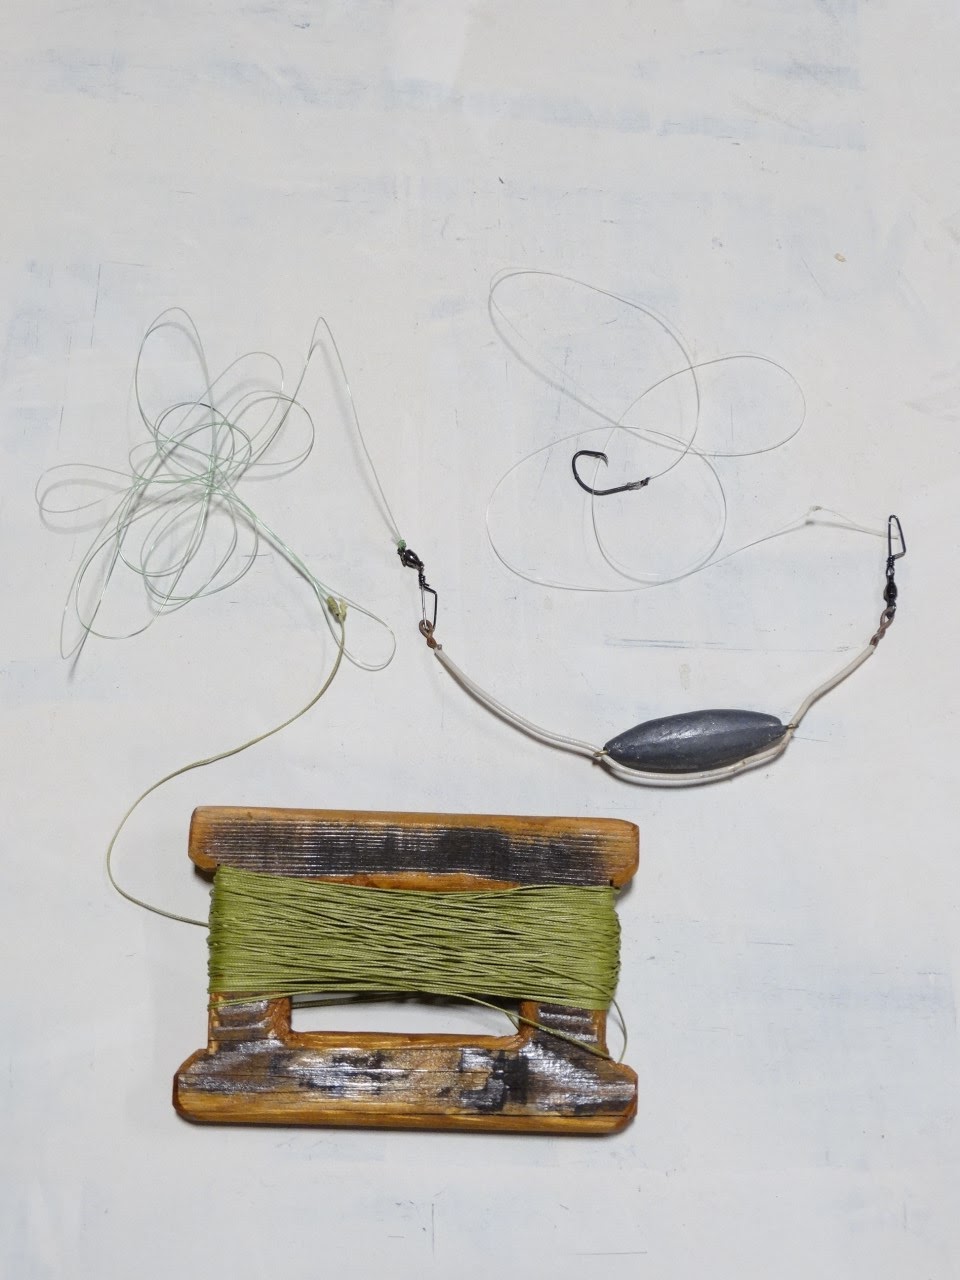
This photo shows the rig which consists of a wooden spool, 200 feet of  300lb braided spectra line, 8 feet of  60 pound mono leader, a  12 oz sinker assembly with swivel hooks followed by 4 feet of 40 pound mono leader snelled to a 5/0 circle hook.

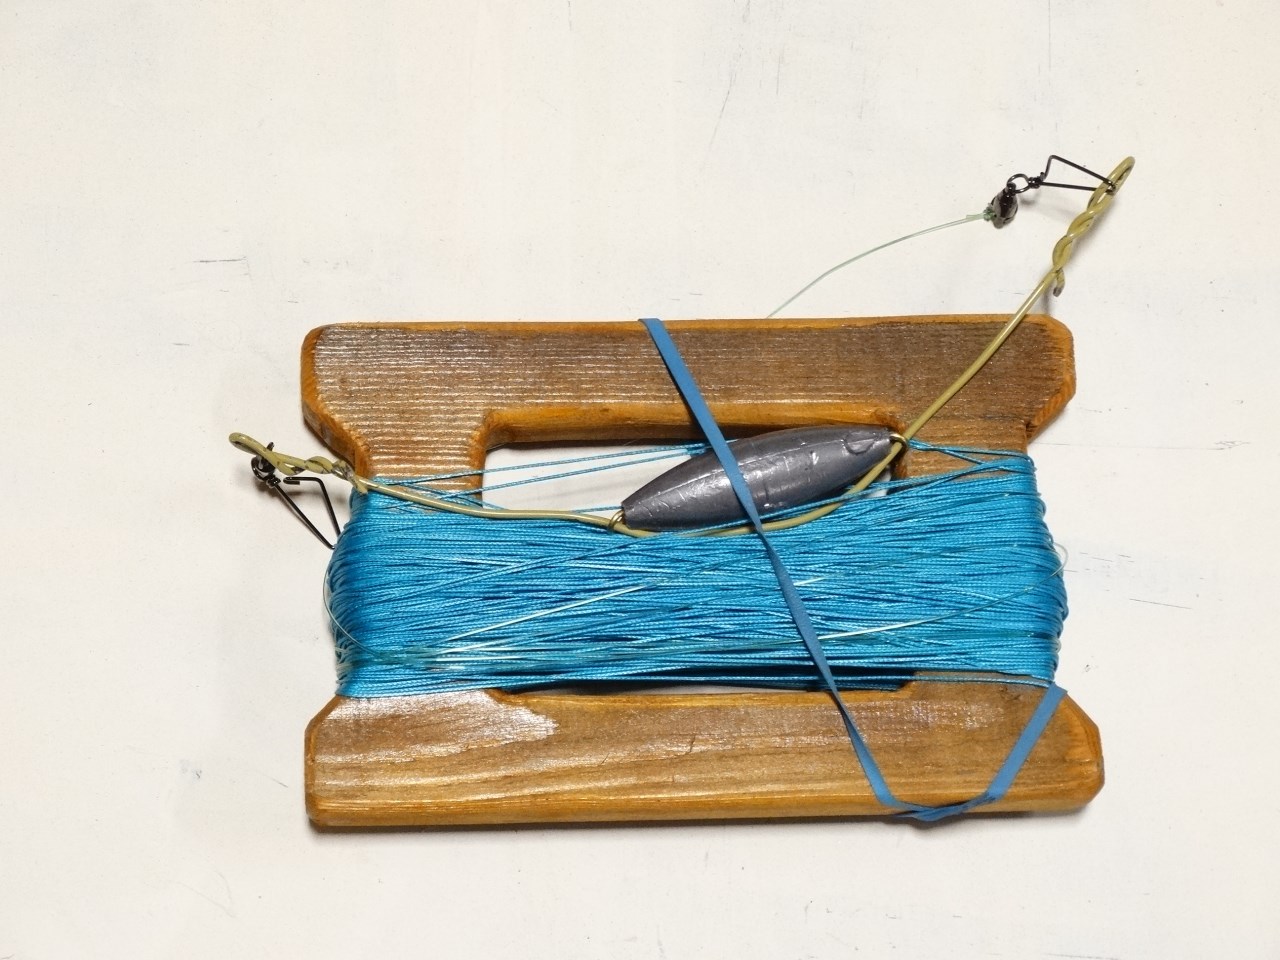
This is what the rig looks like set up for transportation.  Fits nicely in a one gallon ziploc plastic bag. If the wire of the sinker assembly were a little shorter, it would store even better.  This rig has 250 lb braided line with an 8 ounce sinker.
And here's a schematic of the handline assembly.  Some additional comments on the schematic.  The 300 pound braided line comes in various lengths, but 100 meters is a good spool size, that's about 300 feet of line.  You can wind half of that on your spool or even all of it, depending on how deep you want to fish.
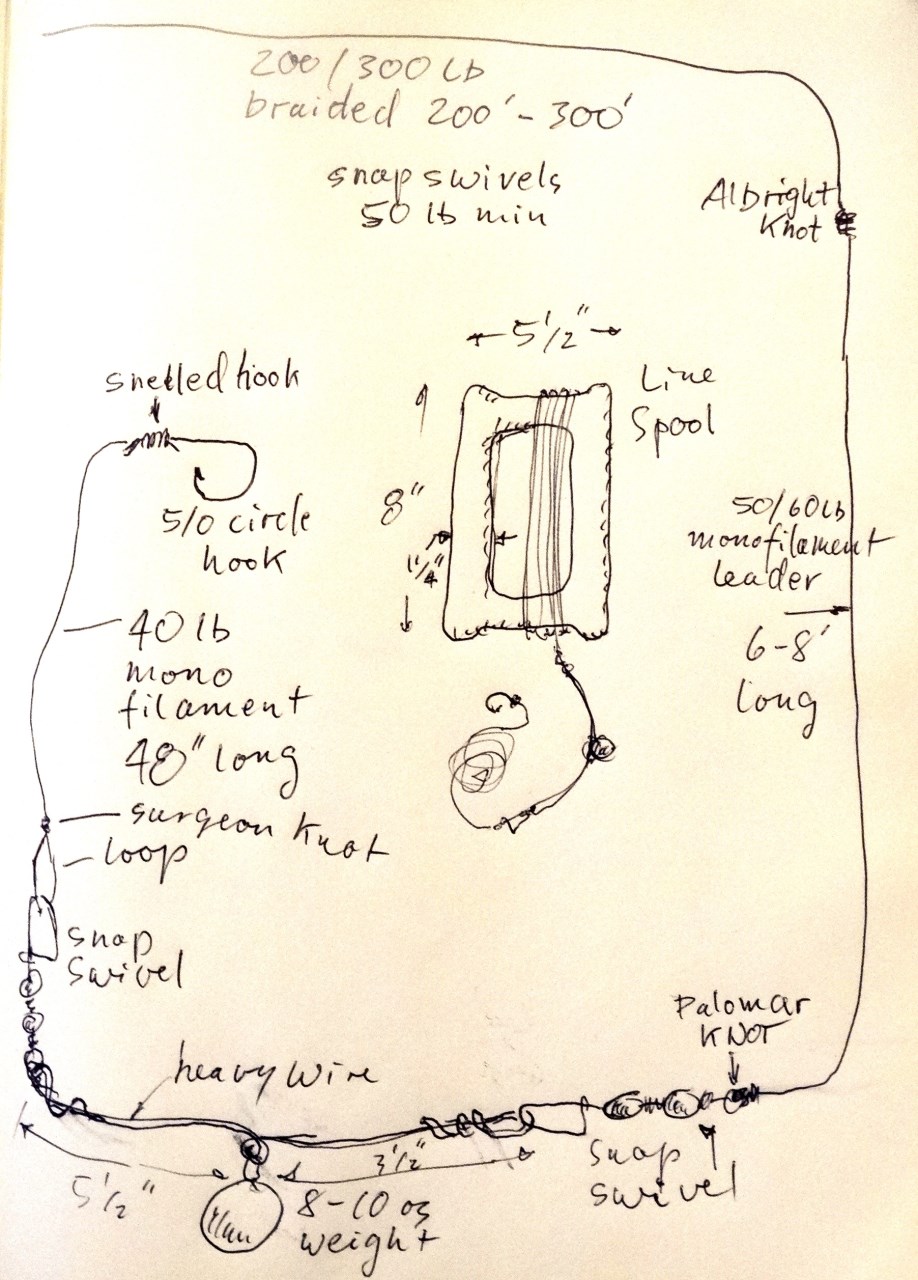
The spool itself is made out of wood. A scrap piece of one by six will do fine.  Before you commit to any dimensions, try wrapping your hands around a length of wood that is 3/4" thick by 1-1/4" wide and has the edges rounded. If the wood needs to be wider or narrower to feel comfortable in your hand, adjust the dimensions on the spool accordingly.  If the long dimension of the spool is longer than 8 inches, you need fewer turns to spool up the line when you're retrieving a fish.  On the other hand, a longer dimension will put more torque on your wrist.
The length of the sinker assembly, which consists of a piece of coat hanger or heavy gauge copper electrical wire with a sinker attached to it  should be about the same as the length of your wooden spool.  This makes it easier to wind up for storage.  Weight of the sinker should be roughly one ounce for every ten feet of depth you are fishing.  That would be 10 oz for 100 feet of line, for instance.  Rate of drift and weight of main line also makes a difference.  You want your line to be as vertical as possible so you can know how close you are to the bottom.  This is where a drift chute comes in handy if there is a wind blowing.  The drift chute slows down your kayak and allows the line to hang more vertical.  Some drift is ok, but you don't want your line going out at 45 degrees.
Snap swivels should have a breaking strength at least that of the lines they are tied to, in our case, at least 50 lbs.  I bought some that were 150 lbs which is overkill.  Overkill is ok sometimes, but the 150 lb wire snaps are pretty hard to get open with bare hands, especially cold bare hands.  And carrying pliers in a kayak is a nuisance.
The idea with this rig is that when you are fishing rock reefs where there is a possibility of snags,  you want the leader to break and lose maybe your hook and bait but not your sinker.  You can carry more snelled hooks and bait, but the sinkers assemblies are more bulky and you want to avoid losing them.  Worst case, you snag the sinker and the 60 pound leader breaks, but you still have your main line.
All the knots mentioned in the schematic can be found on the internet and youtube.  I tried using a double uni knot to tie the 60 pound mono leader to the 300 pound but the mono line was too stiff in comparison to the braided line so that the knot didn't work and ended up using an Albright knot which worked fine.  It takes a while to get the hang of some of these knots especially if you are watching a bad youtube or if you are working with stiff monofilament, but practice pays off.
Thanks again to Marc who taught me this stuff.
The lincod is resting on a plastic rice bag which I keep in my lap when fishing and into which I shove the fish that I catch.  

And here's some fish caught by handline, lincod, and two rockfish.  The little guy is bait herring.  These guys were caught with octopus for bait.

Wednesday, December 14, 2016

A Gift of Lead

Sinkers off the street plus a few hooks. 5lbs 6oz total weight.
Now that I've taken up kayak fishing, I need sinkers to attach to the ends of my lines.  The other day, my wife and I were walking down the street in the direction of the local boat ramp and ran into a whole bunch of broken plastic laying in the street.  Random litter we thought at first, but as it turned out, the litter was pieces of a plastic tackle box that had probably fallen off a boat that was being towed on a trailer away from the boat ramp.  A little closer examination revealed a whole bunch of lead sinkers whose gray color camouflaged them very well against the background of gray asphalt. With my wife's help, I was able to fill two coat pockets with sinkers.  I think I'm set for sinkers for a while and some unlucky fisherman needs to get him a bunch more.
Sinkers arrayed on a white background.

Wednesday, September 14, 2016

14 Foot Baidarka Rebuild - New Ribs

In the last segment of this series, I took everything off the boat that it didn't need.  In this segment, I'm putting in new ribs. And I should mention that I didn't break any ribs. I was very careful to not use any of the rib stock that had grain runout.  Straight grain the the bending stock is the best insurance against breakage.  The rib stock was white oak.  Adequate soaking time is also important as is good heat in the steambox.  Let's look at some pictures.

 Here's the steam setup, an electric wallpaper steamer with about a gallon of water in it.  The hose coming out of the steamer goes in the back of the steambox which is nothing more than a plywood box with a towel hung over the front end. The towel allows for a good flow of steam through the box without letting out too much heat.
 The ribs have been soaked in water for several days.  Here they are cut to working length which is about 10 inches longer than the distance between the gunwales at their respective new homes. All the ribs are marked with a number to minimize confusion when several ribs are in the steambox at the same time.
Here's my adjustable bending jig for the ribs.  The left wing is stationary and the right wing moves to the needed width.
 At any one time, I have three ribs in the steamer. Steam time is not specific, The rightmost rib is the one pulled first, New ribs are fed in on the left so there are always three ribs in the box.  By the time the leftmost rib gets to the right, it is ready to bend.  In the meantime, I am clamping the active rib into the bending jig, letting it sit for about a minute to cool down, then removing it, clamping it into the boat and resetting the jig for the next rib.
Here are all the new ribs clamped in place.  Next I eyeball the ribs from the ends of the boat to make sure they are all clamped in symmetrically.  Then I mark them and trim them to their final length and pop them into their mortises.
Once the ribs are all in place, I let them sit overnight to dry out and take a permanent set. Then I number them. Next day, I pull the ribs out and stain and varnish them which is much easier to do while the ribs are out of the boat than when they are lashed into place.
Here's all the ribs in place but not lashed yet.  Note that the keelson kicks to the right at the tail end of the boat.  We will be fixing that in the next installment of the 14 foot rebuild.

Friday, September 9, 2016

Deckline Mods to my Sixteen Foot Baidarka to Facilitate Fishing

After going out fishing in my 16 foot baidarka I decided to make some mods to the decklines to make it a better fishing boat.  The mods were not extensive but addressed two particular aspect of the existing rigging that could be improved.  One mod improved the ability to stow paddles on the foredeck.  The other mod improved my ability to get out of the boat quickly after landing on the beach. Let's go to the pictures.
 This photo shows a new addition, a longish piece of wood on the left (port) side of the boat. This used to be a feature on Unangan kayaks.  The piece of wood protects the skin from chafing by the fishing line when fisherman pulls in a fish.  Chafing of the skin is probably not as big a deal with a synthetic fabric skin as it is with a sea lion skin, but I thought it might be a good idea to have this feature in any case.
 Deck toggles, the two rectangular piece of wood on either side of the kayak are used to tighten up the deck lines that hold spare paddles in place on the deck.  I moved these closer to the front of the cockpit for easier access.
Here's a closeup of another deck toggle roughly in the shape of a little sea creature.  This is meant to keep a paddle from sliding off the deck when the paddle is just laid on the deck instead of being tucked under the deck lines.
One of the problems when landing in surf is the timing of the waves.  Even if you time the waves coming in and come in on the back of a wave and make a smooth beach landing, you have to get out of the kayak quickly because the next wave is coming in and is likely to pull you back into the surf.  This is especially problematic on steep beaches. With the size of this cockpit and with a lap full of fish, jumping out of the kayak is not easy.  I have to hoist myself up onto the back deck so I can step out of the cockpit.  I do this by placing my hands on the gunwales back of the cockpit and raising myself up.  Unfortunately, the deck is sloped an my hands tent to slide off, so I added toggles in back of the cockpit for a better grip.
If you're paying attention, you will also notice that I added another rub guard on the starboard side of the cockpit.  I thought that might also help with getting in and out of the boat.
And finally, I ran another line between the two deck toggles to keep them from sliding off the edge of the gunwales when I'm hoisting myself out of the cockpit.  I tested all this on the ground. I have yet to try it out on the water where it counts.

And finally, I formalized the padding in the cockpit.  Previously I just had a foam pad in the bottom of the boat.  I still only have a foam pad on the bottom of the boat, but now I cut it in half and doubled up on the bottom and tied it to the ribs and I also added a piece of foarm as a backrest.  This should help with sitting for hours while fishing.
More on the water testing is forthcoming. Stay tuned.

Wednesday, September 7, 2016

Handlining from a Kayak

Two kayak fishermen took me out fishing with them.  I was under the impression that to fish from a kayak you needed lots of gear like rod-holders and landing nets and places to put fish in case you caught some etc. etc.  Turns out that according to my mentors, you don't need most of that stuff.  You don't need rod holders because you don't need a rod and reel to fish from a kayak.  A kayak puts you right on top of the fish and so you don't need a rod to fling your bait or lure out away from your kayak to where the fish are.  The fish are under you and so you just lower the line with the bait into the water below you and the fish bite on your bait.  It's that simple.  The reason this works is that the fish are some distance below you and so they are not spooked as they would be if you just had six feet of water under you. When you have 100 feet of water under you the fish can't see you.
So we went fishing and caught fish.  The reason we caught fish is that one of my mentors had a gps that took us back to a reef where he had caught fish before. His electronic gizmo also had sonar that showed him what the bottom looks like.  We were going for rock fish which hang out over rocks.  If you're fishing where there are no fish, you catch no fish.  Most likely you blame yourself or your bait but the real reason you caught no fish is that you were fishing where there were no fish.
And now for some pictures.
Here's the Pacific at 7 a.m. Not much wind but some shore break from 3 foot swells.

Our put-in point on a shelf some fifty feet above the beach.  Portaging of the kayaks was required.

My host's fish counter. The leg of the string on the left is total fish caught. The leg on the right tracks a different species that has a different limit from the run of the mill rockfish.

The rig, 300 pound braided line with a lead weight and some hooks wound on a wooden spool. What could be simpler?
I should mention something that I noticed before when starting to fish with my canoe is that fishing changes your relationship with your boat and the place where you take your boat out.  Fishing, in this case changed my view of my kayak as a means of putting me into the ocean's food chain, one step above the rock fish but still one step below the sharks that live in the Pacific.  As a consequence, I made some mods to my kayak to make it a better fishing boat.  More on that in a separate post.

Monday, August 15, 2016

Moses Dirks Reads out Aleut Kayak Parts in Unangam Tunuu

Here's a video of Moses Dirks reading out the names of Aleutian Kayak parts in Unangam Tunuu, the Aleut language.  The names and the kayak parts are linked in the picture below for reference. The video was made at the Aleutian Pribiloff Islands Association Urban Culture Camp in Anchorage in 2010.

Click on the image to get a large enough picture to read the text.

Fourteen Foot Baidarka Rebuild

This particular boat suffered the indignity of shrinking skin which caved in a good percentage of its ribs.  So I decided that it was time to rebuild the boat.  Aside from replacing damaged ribs, I also wanted to elevate the rear deck and make the cockpit coaming level.  I had lowered the rear deck to make rolling the boat easier but as it turned out, lowering the back deck simply made it harder to get good back support. So on with the pictures.
What happened was that the nylon skin shrank to such an extent in the hot California sun that it caved in the ribs. Not only did the shrinking skin recurve the ribs, it broked them.  A few ribs at either end of the boat survived.

Slitting the stitching on the deck.

Slitting the lashings around the coaming which hold the skin to the coaming.

The skin has been slit all around, ready to pull it off.

Except for the ribs, the hull is in mostly good shape.

The first step in getting the bad ribs out is to unlash them from the keelson..

The tail fin is looking a bit ragged.  It was made out of plywood and I decided to replace it with redwood.

For some reason I added a deck beam for better foot support without taking the other deck beam out. So that deck beam toward the front had to come out.

Here,s the stuff I took off the boat, coaming, coaming stanchions, tail fin and both the fore and aft deck stringers.  I took off the deck stringers just to make putting the new ribs in easier.

Here's the extra deck beam removed and all the bad ribs.

I already added a new tail fin.

There's the hull stringers hanging out in space waiting for support from a new set of ribs.
Next we will be bending some new ribs, followed by some painting and varnishing and relashing all the stuff that came off during the deconstruction. Stay tuned.

Wednesday, August 10, 2016

What Are Your Favorite Skin-Boat Related Websites and Blogs?

I'm trying to fill out my list of skin-boat related blogs and websites that have useful information for would-be kayak builders.  If you have any favorites, feel free to list them in the comments.  Feel free to suggest sites even if they are related to canoes or any other small boat building practices.  I will check them out and add them to the list on my website and to the blog roll and like box on this blog.  Thank you.

Monday, August 8, 2016

Overhaul the Playboat, Part 7

There's one more part of the playboat overhaul that I should document and that is the relocation of the deck beam at the back of the cockpit after I had already put the skin on the boat.  Messing with the frame is best done when the skin is off the boat, but it wasn't until after I put the finished boat in the water and paddled it that I discovered that it would be better if the back deck beam were a few inches farther back so it would line up with the back of the coaming .  The main problem was that since it didn't line up with the back of the coaming, it jabbed into my back when I was paddling.  It's one of those things that don't reveal themselves till you actually use the boat, kind of like too tight shoes.
The back of the cockpit is on the right. You can see the deck beam that supports the back of the coaming sticking out a good three inches in front of the coaming's back.  Had to fix that.

Here's what the fix looked like from the outside when done.  I had to cut the skin to get at the three stainless steel screws that were holding the deckbeam in place against the gunwales. I had to do this surgery on both sides of the frame.  Once I had the screws out, I had to cut the pegs and lashings that secured the deck beam to the deck stringers.  Once the deckbeam was free, I trimmed it down to fit farther back in the boat and re-attached it to the gunwales.  What you see here is the net result. The deck beam is still held in place by three screws.  Two of them under the skin flap that I glued back down and one off to the right of the skin flap screwed right through the skin.

Here's the view of the relocated deck beam from inside the boat looking up.  That red piece of wood at the top is a carlin that supports the side of the coaming.  The exposed wood shows where the deckbeam used to sit.

View of the surgery on the other side of the boat.  I also had to add a support for the carlin, nailed it to the edge of the deck beam with bronze ring nails.

Interior view looking forward.

Interior view looking aft.
And that should be the end of coverage for this kayak remodel unless some other thing comes up that I haven't discovered yet.

Tuesday, August 2, 2016

Overhaul the Playboat, Part 6

Skipping part 5 which is where I decided to add a King Island style nose to the kayak.  The point of this was to elevate the bow to minimize water coming over the bow in oncoming waves.  No pictures of that process available though you can see the end result here.
Viewing from back to front, fog bank hanging over the west end of San Francisco, San Francisco downtown skyline, salt marsh, tidal pond, chain link fence, and finally the newly varnished playboat.

closeup on the foredeck with faux sealskin paint splatter.

And the rear deck.

Little better side view showing extensions to the hull, a foot in the bow and another foot in the stern making the finished boat 12 feet over the original 10.

The nose, like some menacing sea creature.

View inside the cockpit with detail of spray painted frame and seam in the skin pieced in two parts.

Time has passed, the grass has dried out and the playboat is awaiting its first trip on the water.
Postscript:  I launched the boat, found that the back deck beam in the cockpit was digging in my back and so I moved it back a few inches to make the boat more comfortable.  Also needed to put more sealant on the seams since they were still taking on water.  In spite of the extra two feet, the boat is still  pretty low volume for someone my size.  Were I to build another 12 footer from scratch, I would make the stern beamier and raise the bow some more. The End.

Monday, August 1, 2016

Overhaul the Playboat, Part 4

As promised, I took a can of red spray paint and loosely misted the flat desert storm camo paint I had put on the frame of the playboat.  Made it look a whole lot more traditional. Photos below.


All this by the way happened way back in February as evidenced by the green grass and yellow flowers.  But there's still more to come.  The playboat is going to get  a nose-job and a skin. Can't wait to share.